How to optimize images for SEO
If content is king to a blog, images are the queen. Without images your page just doesn't pop, it looks unfinished and downright boring. Images bring your written content to life to your site's visitors and provide visual breaks for your readers. I think we all can agree that images matter on the Internet today. Have you ever stopped to think about how a search engine bot interprets your images? If you're like most people, the answer is no.
Let's take a look at some of the most common mistakes made when posting images to your blog
Using the right contextual image
First and foremost, when it comes to images, make sure they make sense and further your article's message or story. You may use graphs, GIFs, or a landscape photo, the image should further your message to your reader. If it doesn't make sense, you will have missed a big opportunity to share your image through Google Image Search and other image finding systems. When picking your image, remember, Google bot can "look" at the image, but doesn't read the image. This means that any text in your image will not be searchable by any search engine bots. If you need text in your image, just understand the only one who will read that text is a person who has already made it to your site, or finds your image, off your site, through a Google Image Search.
Preparing images to use on your website
File names of your images matter
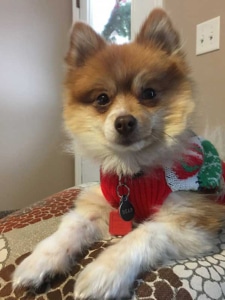
One of the most overlooked areas of image SEO is the file name itself. If you take images with your phone or DSLR your file name created by the camera will be something like IMG_1092.jpg or 2017-01-04_0919284.jpg. When your camera takes a picture it has no idea what is in the image, but you do! If you were to upload the image with the original file name to a bot it would look something like this:
https://www.yourURL.com/images/IMG_1092.jpg
Based on that code alone, do you think the bot knows what is in the image?
Now let's say the image code looked like this:
https://www.yourURL.com/images/littlebear_pomeranian_dog_in_ugly_sweater.jpg
Do you know what is in that image now?
With a descriptive file name, the image name contains descriptions of what is in the image and the bot can now add it to the search parameters. The image name should always contain a keyword to describe the image and hopefully, you have made that keyword match up with your page's keywords.
 Right-Size images BEFORE you upload
 Right-Size images BEFORE you upload
An often overlooked area of preparing your photos for your website is to Right-Size your photos for your website before loading. Many CMS's automatically make different size copies of your image when you load them, but these will never be as good as making the files the right size for your website, in desktop, tablet, and mobile sizes before loading. Use this 5 step guide to compress your images for free.
Why does this matter? Download speeds. If you have a page that has all of your 6MB-10MB images on the site, and you link to these images you will force the browser to download these large files in order to see your website. For users on phones, or in areas with lower levels of internet service, this could be the difference between someone staying or your site, or giving up because the page never loads.
Understanding Scale
Let's say you upload a 4000 x 3000 pixel image (around 8.5 megapixels) but only use that image in a box that is 200 x 150 pixels (about 0.88 megapixels), which site do you think will load faster? If you know where your image will be used on a site, scale and crop your image prior to uploading it. You know then the image will fit exactly as intended without any extra load time.
Reducing File Size
Once you have the right scale, it is time to start thinking about file type and size. There are a bunch of tools to help with this. I tend to use the export for web function in PhotoShop when appropriate. This function allows me to preview images at various qualities until I find the one that looks right at my proportions then export it. Then I head over to Squoosh.App and follow these 5 steps to get my images dialed in.
Some other tools you can check out: Squoosh.App, ImageOptim, or PunyPNG.
When picking the right file type there are a few simple rules:
- JPG: Pictures of real-life objects with no clear backgrounds. This can include jpg, jpeg, and jpeg2000. Best Compression for true photos.
- PNG: Best for images with clear backgrounds, and limited color illustrations. Do not use for photographs.
- WebP: Great image compression with transparent and lossless options. The only downside, not all browsers can show these images yet.
- SVG: Scaleable vector images like logos and icons. They can have clear backgrounds and can be scaled up and down easily.
- GIF: Limited image colors (only 256 available). It should really only be used for moving images but be careful, moving images can be deceptively large in file size compared to pixel height and width. Avoid these whenever possible. If you want to animate something, consider a JSON based system like LottieFiles.
- AVIF: The future... AVIF is not quite ready for the whole world at the time of this writing, but this image compression type is already helping to compress video images. Keep an eye out for the AVIF as it comes to a browser near you.
After you have uploaded the image, head over to YSlow, and see if your image optimization succeeded.
Inserting images in your articles
Now you have picked out the perfect image for your article, you have named it, scaled it, and sized it correctly for where you want to use it on your site. Now it is time to put that image into your site. Make sure you add it to the content as close as you can to the related information in your article. If you can, make sure you load the right image for each size window (Desktop, Tablet, Mobile), as well.
 Alt Image Text
The Alt Image text is an often overlooked area of inserting an image. The "ALT text" was originally used in HTML to take the place of images when an image would not load or in the case of someone being blind or unable to see your images. Put simply, the Alt Text ensures that no information or functionality is lost if your image is missing or does not load. To a search engine bot, the alt image text, in coordination with your image file name, helps it to determine what is in your image and ultimately the content of your page.
Also, be sure to add the title text into the "img" tag to ensure total coverage by all browsers. Your title tag and alt image tag can have the same text, without knocking your SEO score. The title tag is also a way to add not critical information about your image like color tones, backdrops, secondary information, etc. Oftentimes, the browser will display your Title Text on mouseover as well.
If your image contains the text you would like search engines to see, be sure to include that text in your Alt or Title text.
Your image checklist
Here is the simple checklist you are looking for with your images.
- Use your own image or an image you have the rights to that matches your text
- Pick the right descriptive file name for your image
- Right Size your image dimension match the size as it will be displayed
- Reduce file size for faster loading without losing good resolution
- Always use alt image text, the title text is optional and can be the same as your alt text
Remember, images play an important role in the readability of your website by users and by the search engine bots. Take a little extra time up front to get some great payoff in the end.